Search This Blog

Tuesday, October 16, 2012

Using "X-Forwarded-For" in Apache or PHP

Using "X-Forwarded-For" in Apache or PHP:


Modifying Apache's Log Format
Well, Joe has a post describing how to obtain this value in IIS. But that doesn't really help if you're not running IIS and like me have chosen to run a little web server you may have heard of called Apache.
Configuring Apache to use the X-Forwarded-For instead of (or in conjunction with) the normal HTTP client header is pretty simple.ApacheWeek has a great article on how to incorporate custom fields into a log file, but here's the down and dirty. Open your configuration file (usually in /etc/httpd/conf/) and find the section describing the log formats. Then add the following to the log format you want to modify, or create a new one that includes this to extract the X-Forwarded-For value:
    %{X-Forwarded-For}i
That's it. If you don't care about the proxy IP address, you can simply replace the traditional %h in the common log format with the new value, or you can add it as an additional header. Restart Apache and you're ready to go.

reverse proxy - nginx real_ip_header and X-Forwarded-For seems wrong - Server Fault

reverse proxy - nginx real_ip_header and X-Forwarded-For seems wrong - Server Fault:


I believe the key to solving X-Forwarded-For woes when multiple IPs are chained is the recently introduced configuration option, real_ip_recursive (added in nginx 1.2.1 and 1.3.0). From the nginx realip docs:
If recursive search is enabled, an original client address that matches one of the trusted addresses is replaced by the last non-trusted address sent in the request header field.
nginx was grabbing the last IP address in the chain by default because that was the only one that was assumed to be trusted. But with the new real_ip_recursive enabled and with multipleset_real_ip_from options, you can define multiple trusted proxies and it will fetch the last non-trusted IP.
For example, with this config:
set_real_ip_from 127.0.0.1;
set_real_ip_from 192.168.2.1;
real_ip_header X-Forwarded-For;
real_ip_recursive on;
And an X-Forwarded-For header resulting in:
X-Forwarded-For: 123.123.123.123, 192.168.2.1, 127.0.0.1
nginx will now pick out 123.123.123.123 as the client's IP address.
As for why nginx doesn't just pick the left-most IP address and requires you to explicitly define trusted proxies, it's to prevent easy IP spoofing.
Let's say a client's real IP address is 123.123.123.123. Let's also say the client is up to no good, and they're trying to spoof their IP address to be 11.11.11.11. They send a request to the server with this header already in place:
X-Forwarded-For: 11.11.11.11
Since reverse proxies simply add IPs to this X-Forwarded-For chain, let's say it ends up looking like this when nginx gets to it:
X-Forwarded-For: 11.11.11.11, 123.123.123.123, 192.168.2.1, 127.0.0.1
If you simply grabbed the left-most address, that would allow the client to easily spoof their IP address. But with the above example nginx config, nginx will only trust the last two addresses as proxies. This means nginx will correctly pick 123.123.123.123 as the IP address, despite that spoofed IP actually being the left-most.

HttpRealipModule

HttpRealipModule:


This module allows to change the client's IP address to value from request header (e. g. X-Real-IP or X-Forwarded-For).
It is useful if nginx works behind some proxy of L7 load balancer, and the request comes from a local IP, but proxy add request header with client's IP.
This module isn't built by default, enable it with the configure option
--with-http_realip_module
Example:
set_real_ip_from   192.168.1.0/24;
set_real_ip_from   192.168.2.1;
real_ip_header     X-Real-IP;

Directives

set_real_ip_from

Syntax:set_real_ip_from address | CIDR | unix:
Default:
Context:http
server
location
Reference:set_real_ip_from

real_ip_header

Syntax:real_ip_header field | X-Real-IP | X-Forwarded-For
Default:X-Real-IP
Context:http
server
location
Reference:real_ip_header

This directive sets the name of the header used for transferring the replacement IP address.
In case of X-Forwarded-For, this module uses the last ip in the X-Forwarded-For header for replacement.

real_ip_recursive

Syntax:real_ip_recursive on | off
Default:off
Context:http
server
location
Appeared in:1.3.0
1.2.1
Reference:real_ip_recursive

Friday, October 12, 2012

How to Install Vodafone 3G USB Modem on Ubuntu

How to Install Vodafone 3G USB Modem on Ubuntu:


How to Install Vodafone 3G USB Modem on Ubuntu

Configure Vodafone 3G Modem on Linux

Vodafone offers HUWEI K3570-Z USB Stick for their 3G wireless broadband plans. If you've purchased this 3G USB Modem from vodafone then it's very easy to surf on windows. The real challenge is in connecting the modem to linux operating system and get it working. In this hub you'll learn how to connect this modem to linux distro - ubuntu. The Information presented on this hub applies to any other linux distro but you have to find respective files from repository on your own as i can't cover installation instruction for every distro out there.
As per my testing current tutorial works for :
  • Ubuntu 10.04/10.10/11.04/11.10
  • Kubuntu
  • Fedora
  • Eee PC

There are two ways to connect USB Modem to ubuntu. First method involves installing usb-modeswitch library and manually mounting the USB drive. Second method involves usage of sakis3g library that makes connecting to the internet very easy. So it's upto you to choose any one of these methods and get yourself connected to the internet.
Vodafone 3G USB Mounted on Ubuntu

Method 1: Installing 3G USB Modem on Linux

In case of ubuntu you need to open synaptic package manager and download these two libraries.

usb-modeswitch
usb-modeswitch-data

If you're downloading these libraries via terminal then don't forget to install them. Once you get these two packages installed, you need to set your file manager for manual mount and run for CD and USB devices. So you have to disable the automount andautorun.

You can do that by following these instructions.

Press ALT+ F2 and type ' gconf-editor' (Without the quotes)

You'll find new window with configuration settings. Click on apps folder and then navigate to nautilus, double click on preferences directory. You'll see some options of right hand side panel.

Uncheck the following options:
  • media_automount
  • media_automount_open

Check this option

media_autorun_never

This step will stop ubuntu to open 3G USB modem device as a folder and it just mounts the device when you connect to it. Now that you have everything setup, you can create configuration for this USB modem in network connections. You can connect to the internet by browsing this new configured profile from here. If you don't find the modem in the list of profiles, you can reboot the machine again by keeping USB stick connected. This way you'll find the profile in the list and you can connect easily.

Method 2: Sakis3g Script to Connect USB Modem

In comparison to previous method connecting your modem using sakis3g is relatively easy. It has usb-modeswitch library built-in and it also supports many vodafone and other network regions around the world. Sakis3g has many ubuntu python developers that are maintaining vodafone support on this script.

Following 3G USB Modems are tested and found working with sakis3g:
  • ZTE K3570-Z
  • K3565
  • K3765

For ubuntu follow these steps to install sakis3g.

sudo apt-get install ppp
cd /usr/bin
wget 'http://www.sakis3g.org/versions/latest/sakis3g.gz'

sudo gunzip sakis3g.gz
sudo chmod +x sakis3g

Here i'm using sudo before every bash command because ubuntu requires sudo permissions to do anything on bin directory. Once you get it installed just run the following command on terminal.

sakis3g status

If it's installed successfully you can proceed to running the script with command 'sakis3g'. If not then you have to clear all the dependencies issue or any other issue.

Entering the sakis3g command in terminal will open a small window that asks you to choose options. First option is 'connect to 3g'. Select this option and click OK. Next option will ask you to choose between interface 3 or 4. Choose interface 3 and click on OK button. Next option wil ask you to choose generic driver or kernel driver. Choose generic driver and see if installation proceeds. Don't worry if it throws errors. Just keep on changing the options until it works. Then finally when you get option for APN_username and APN_Password. You have to consult with your vodafone operator for help. Or just ask in regional forums for help. In my case vodafone india has www as username and blank password. It worked for me but it may not work for you.
Sakis3g quits while entering the pin in some cases but I simply restarted the script every time and randomly it worked. Once it works, Just create an desktop shortcut to save your future hassles of entering the details. At the end, you have to keep testing.

Once you get the sakis3g running, it'll tell you that it's connected. Don't forget to have desktop shortcut for sakis settings as it makes it easy for you to run the connection script every time you boot or whenever you want.

Hope this helps to those who are searching for a way to connect their vodafone usb modem to the internet.

Wednesday, October 10, 2012

Friday, October 5, 2012

Kickstart (Linux) - Wikipedia, the free encyclopedia

Kickstart (Linux) - Wikipedia, the free encyclopedia:

The Red Hat Kickstart installation method[1] is used primarily (but not exclusively) by the Red Hat Enterprise Linux operating system to automatically perform unattended operating system installation and configuration. Red Hat publishes Cobbler as a tool to automate the Kickstart configuration process.

FAI - Fully Automatic Installation

FAI - Fully Automatic Installation:

FAI is a non-interactive system to install, customize and manage Linux systems and software configurations on computers as well as virtual machines and chroot environments, from small networks to large-scale infrastructures like clusters and cloud environments.
It's a tool for unattended mass deployment of Linux. You can take one or more virgin PC's, turn on the power, and after a few minutes, the systems are installed, and completely configured to your exact needs, without any interaction necessary.

Cobbler - Linux install and update server

Cobbler - Linux install and update server:

Cobbler is a Linux installation server that allows for rapid setup of network installation environments. It glues together and automates many associated Linux tasks so you do not have to hop between lots of various commands and applications when rolling out new systems, and, in some cases, changing existing ones. It can help with installation, DNS, DHCP, package updates, power management, configuration management orchestration, and much more.

Chef | Opscode

Chef | Opscode:

Chef is an open-source systems integration framework built specifically for automating the cloud. No matter how complex the realities of your business, Chef makes it easy to deploy servers and scale applications throughout your entire infrastructure. Because it combines the fundamental elements of configuration management and service oriented architectures with the full power of Ruby, Chef makes it easy to create an elegant, fully automated infrastructure.

What is CFEngine? - CFEngine - Distributed Configuration Management

What is CFEngine? - CFEngine - Distributed Configuration Management:


CFEngine does not only build systems, it maintains them over time, checking the system in real-time for compliance with your model of desired state. It runs on the smallest embedded devices, on servers, in the cloud, and on mainframes, easily handling tens of thousands of hosts.
CFEngine is available as both open source and commercial software. See the differences here and decide which is right for your organization.

2.x Getting Started · capistrano/capistrano Wiki · GitHub

2.x Getting Started · capistrano/capistrano Wiki · GitHub:

This tutorial will walk you through the basics of setting up and using Capistrano. It will not introduce you to the deployment system that is bundled with Capistrano, but will instead focus on the more general areas of executing Capistrano and writing your own recipes. It will be primarily of interest to those wanting to use Capistrano in non-deployment domains, and to those who just wish to become more familiar with Capistrano itself.

CloudStack | Open Source Cloud Computing

CloudStack | Open Source Cloud Computing:

Apache CloudStack is open source software written in java that is designed to deploy and manage large networks of virtual machines, as a highly available, scalable cloud computing platform. CloudStack current supports the most popular hypervisors VMware, Oracle VM, KVM, XenServer and Xen Cloud Platform. CloudStack offers three ways to manage cloud computing environments: a easy-to-use web interface, command line and a full-featured RESTful API.

UserCake - Opensource PHP user management system

UserCake - Opensource PHP user management system:


Usercake -- Features
  1. Login
  2. Register
  3. Lost password recovery
  4. Update password
  5. Update user email
  6. Email templates (optional)
  7. SHA1 security + Salt / Hash
  8. Account activation (optional)
  9. Resend activation email (optional)
  10. Permission levels
  11. Multilingual support
  12. User admin panel
  13. Permission level admin panel
  14. Template system
  15. Captcha for registration

Thursday, October 4, 2012

On efficiently geo-referencing IPs with MaxMind GeoIP and MySQL GIS « Jeremy Cole

On efficiently geo-referencing IPs with MaxMind GeoIP and MySQL GIS « Jeremy Cole:


On efficiently geo-referencing IPs with MaxMind GeoIP and MySQL GIS

Geo-referencing IPs is, in a nutshell, converting an IP address, perhaps from an incoming web visitor, a log file, a data file, or some other place, into the name of some entity owning that IP address. There are a lot of reasons you may want to geo-reference IP addresses to country, city, etc., such as in simple ad targeting systems, geographic load balancing, web analytics, and many more applications.
This is a very common task, but I have never actually seen it done efficiently in MySQL in the wild. There is a lot of questionable adviceon forums, blogs, and other sites out there on this topic. After working with a Proven Scaling customer, I recently did some thinking and some performance testing on this problem, so I thought I would publish some hard data and advice for everyone.
Unfortunately, R-tree (spatial) indexes have not been added to InnoDB yet, so the tricks in this entry only work efficiently with MyISAM tables (although they should work with InnoDB, they will perform poorly). This is actually OK for the most part, as the geo-referencing functionality most people need doesn’t really need transactional support, and since the data tables are basically read-only (monthly replacements are published), the likelyhood of corruption in MyISAM due to any server failures isn’t very high.

The data provided by MaxMind

MaxMind is a great company that produces several geo-referencing databases. They release both a commercial (for-pay, but affordable) product called GeoIP, and a free version of the same databases, called GeoLite. The most popular of their databases that I’ve seen used is GeoLite Country. This allows you look up nearly any IP and find out which country (hopefully) its user resides in. The free GeoLite versions are normally good enough, at about 98% accurate, but the for-pay GeoIP versions in theory are more accurate. In this article I will refer to both GeoIP and GeoLite as “GeoIP” for simplicity.
GeoIP Country is available as a CSV file containing the following fields:
  • ip from, ip to (text) — The start and end IP addresses as text in dotted-quad human readable format, e.g. “3.0.0.0″. This is a handy way for a human to read an IP address, but a very inefficient way for a computer to store and handle IP addresses.
  • ip from, ip to (integer) — The same start and end IP addresses as 32-bit integers1, e.g. 50331648.
  • country code — The 2-letter ISO country code for the country to which this IP address has been assigned, or in some cases other strings, such as “A2″ meaning “Satellite Provider”.
  • country name — The full country name of the same. This is redundant with the country code if you have a lookup table of country codes (including MaxMind’s non-ISO codes), or if you make one from the GeoIP data.

A simple way to search for an IP

Once the data has been loaded into MySQL (which will be explained in depth later), there will be a have a table with a range (a lower and upper bound), and some metadata about that range. For example, one row from the GeoIP data (without the redundant columns) looks like:
ip_fromip_tocountry_code
5033164868257567US
The natural thing that would come to mind (and in fact the solutionoffered by MaxMind themselves2) is BETWEEN. A simple query to search for the IP 4.2.2.1 would be:
SELECT country_code
FROM ip_country
WHERE INET_ATON("4.2.2.1") BETWEEN ip_from AND ip_to
Unfortunately, while simple and natural, this construct is extremely inefficient, and can’t effectively use indexes (although it can use them, it isn’t efficient). The reason for this is that it’s an open-ended range, and it is impossible to close the range by adding anything to the query. In fact I haven’t been able to meaningfully improve on the performance at all.

A much better solution

While it probably isn’t the first thing that would come to mind,MySQL’s GIS support is actually perfect for this task. Geo-referencing an IP address to a country boils down to “find which range or ranges this item belongs to”, and this can be done quite efficiently usingspatial R-tree indexes in MySQL’s GIS implementation.
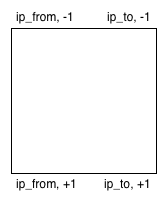
The way this works is that each IP range of (ip_fromip_to) is represented as a rectangular polygon from (ip_from, -1) to (ip_to, +1) as illustrated here:
In SQL/GIS terms, each IP range is represented by a 5-point rectangular POLYGON like this one, representing the IP range of 3.0.0.0 – 4.17.135.31:
POLYGON((
  50331648 -1,
  68257567 -1,
  68257567  1,
  50331648  1,
  50331648 -1
))
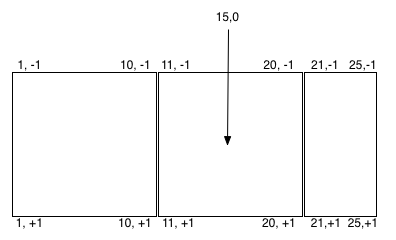
The search IP address can be represented as a point of (ip, 0), and that point with have a relationship with at least one of the polygons (provided it’s a valid IP and part of the GeoIP database) as illustrated here:
It is then possible to search these polygons for a specific point representing an IP address using the GIS spatial relationship functionMBRCONTAINS and POINT3 to search for “which polygon contains this point” like this:
SELECT country_code
FROM ip_country
WHERE MBRCONTAINS(ip_poly, POINTFROMWKB(POINT(INET_ATON('4.2.2.1'), 0)))
Pretty cool huh? I will show how to load the data and get started, then take look at how it performs in the real world, and compare the raw numbers between the two methods.

Loading the data and preparing for work

First, a table must be created to hold the data. A POLYGON field will be used to store the IP range. Technically, at this point the ip_from andip_to fields are unnecessary, but given the complexity of extracting the IPs from the POLYGON field using MySQL functions, they will be kept anyway. This schema can be used to hold the data4:
CREATE TABLE ip_country
(
  id           INT UNSIGNED  NOT NULL auto_increment,
  ip_poly      POLYGON       NOT NULL,
  ip_from      INT UNSIGNED  NOT NULL,
  ip_to        INT UNSIGNED  NOT NULL,
  country_code CHAR(2)       NOT NULL,
  PRIMARY KEY (id),
  SPATIAL INDEX (ip_poly)
);
After the table has been created, the GeoIP data must be loaded into it from the CSV file, GeoIPCountryWhois.csv, downloaded from MaxMind. The LOAD DATA command can be used to do this like so:
LOAD DATA LOCAL INFILE "GeoIPCountryWhois.csv"
INTO TABLE ip_country
FIELDS
  TERMINATED BY ","
  ENCLOSED BY """
LINES
  TERMINATED BY "n"
(
  @ip_from_string, @ip_to_string,
  @ip_from, @ip_to,
  @country_code, @country_string
)
SET
  id      := NULL,
  ip_from := @ip_from,
  ip_to   := @ip_to,
  ip_poly := GEOMFROMWKB(POLYGON(LINESTRING(
    /* clockwise, 4 points and back to 0 */
    POINT(@ip_from, -1), /* 0, top left */
    POINT(@ip_to,   -1), /* 1, top right */
    POINT(@ip_to,    1), /* 2, bottom right */
    POINT(@ip_from,  1), /* 3, bottom left */
    POINT(@ip_from, -1)  /* 0, back to start */
  ))),
  country_code := @country_code
;
During the load process, the ip_from_stringip_to_string, andcountry_string fields are thrown away, as they are redundant. A few GIS functions are used to build the POLYGON for ip_poly from theip_from and ip_to fields on-the-fly. On my test machine it takes about 5 seconds to load the 96,641 rows in this month’s CSV file.
At this point the data is loaded, and everything is ready to go to use the above SQL query to search for IPs. Try a few out to see if they seem to make sense!

Performance: The test setup

In order to really test things, a bigger load testing framework will be needed, as well as a few machines to generate load. In my tests, the machine being tested, kamet, is a Dell PowerEdge 2950 with Dual Dual Core Xeon 5050 @ 3.00Ghz, and 4GB RAM. We have four test clients, makalu{0-3}, which are Apple Mac Mini with 1.66Ghz Intel CPUs and 512MB RAM. The machines are all connected with aNetgear JGS524NA 24-port GigE switch. For the purposes of this test, the disk configuration is not important. On the software side, the server is running CentOS 4.5 with kernel 2.6.9-55.0.2.ELsmp. The Grinder 3.0b32 is used as a load generation tool with a custom Jython script and Connector/J 5.1.5 to connect to MySQL 5.0.45.
There are a few interesting metrics that I tested for:
  • The latency and queries per second with a single client repeatedly querying.
  • Does the number of queries handled increase as the number of clients increases?
  • Is latency and overall performance adversely affected by many clients?
The test consisted of an IP search using the two different methods, and varying the number of clients between 1 and 16 in the following configurations:
ClientsMachinesThreads
111
212
414
824
1644
Each test finds the country code for a random dotted-quad format IP address passed in as a string.

How does it perform? How does it compare?

There are a few metrics for determining the performance of these searches. If you tried the BETWEEN version of this query, you may have noticed that, in terms of human time, it doesn’t take very long anyway: I pretty consistently got 1 row in set (0.00 sec). But don’t let that fool you.
It’s clear that GIS wins hands down.
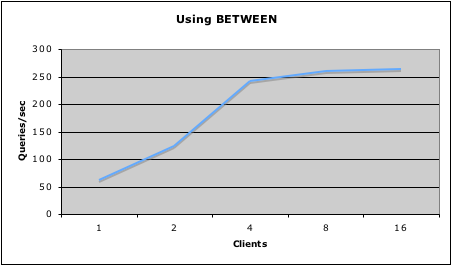
First, a look at raw performance in terms of queries per second.
Using BETWEEN, we max out at 264q/s with 16 clients:
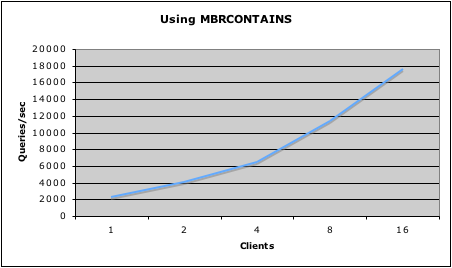
Using MBRCONTAINS, we max out at 17600q/s with 16 clients, and it appears that it’s the test clients that are maxed out, not the server:
Next, a look at latency of the individual responses.
Using BETWEEN, we start out with a single client at 15.5ms per request, which is not very good, but still imperceptible to a human. But with 16 clients, the latency has jumped to 60ms, which is longer than many web shops allocate to completely construct a response. As the number of test clients increases, the latency gets much worse, because the query is so dependent on CPU:
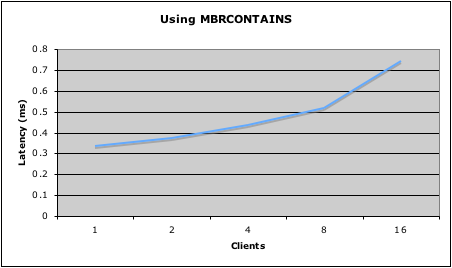
Using MBRCONTAINS, we start out with a single client at 0.333ms per request, and even with 16 clients, we are well under 1ms at 0.743ms:

Conclusion

Definitely consider using MySQL GIS whenever you need to search for a point within a set of ranges. Performance is fantastic, and it’s relatively easy to use. Even if you are an all-InnoDB shop, as most of our customers are (and we would recommend), it may very well be worth it to use MyISAM specifically for this purpose.

Update 1: Another way to do it, and a look at performance

Andy Skelton and Nikolay Bachiyski left a comment below suggesting another way this could be done:
SELECT country_code 
FROM ip_country
WHERE ip_to >= INET_ATON('%s') 
ORDER BY ip_to ASC 
LIMIT 1
This version of the query doesn’t act exactly the same as the other two — if your search IP is not part of any range, it will return the next highest range. You will have to check whether ip_from is <= your IP within your own code. It may be possible to do this in MySQL directly, but I haven’t found a way that doesn’t kill the performance.
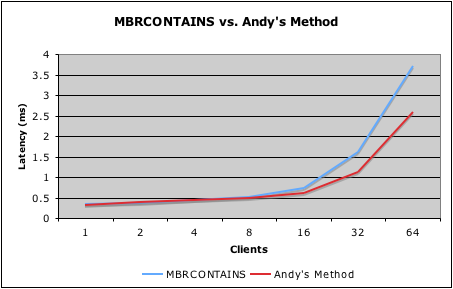
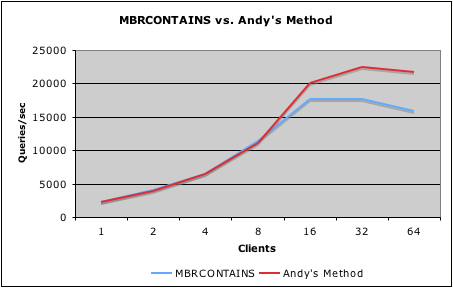
Andy’s version actually performs quite well — slightly faster and more scalable than MBRCONTAINS. I added two new performance testing configurations to better show the differences between the two:
ClientsMachinesThreads
3248
64416
Here’s a performance comparison of MBRCONTAINS vs. Andy’s Method:
Latency (ms) — Lower is better:
Queries per second — Higher is better:
Once I get some more time to dig into this, I will look at why exactlyBETWEEN is so slow. I’ve also run into an interesting possible bug in MySQL: If you add a LIMIT 1 to the BETWEEN version of the query, performance goes completely to hell. Huh?
Thanks for the feedback, Andy and Nikolay.